Archive for the ‘Uncategorized’ Category

I’m Back

Posted: January 5, 2012 in Uncategorized

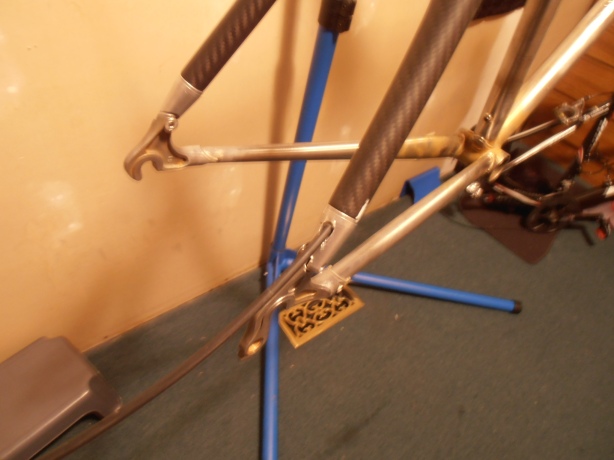
I got really busy during the holidays and going to Boise to meet up with my cycling coach but anyway I played hookie yesterday and finished things up. Amazingly, getting the bottle cage bosses and the cable stops straight was harder than you would think. I’ll have to come up with some sort of jig to make things easier. The other issue I ran into was that the seat stay connector tube is oval and the programs that give you a miter template are based on round tubes so I just guestimated with a sharpy to rough the miter in and then filed until I got it right. I also was having heartburn with the additional work that was going to be required to attach cable guides/stop to the carbon seat stay so I ended up drilling a hole in the right clevis pin (that attaches to the right rear drop out) and the left side of the wishbone to route the rear derailleur cable housing internally through the seat stay. Once again, sorry for the blurry pictures.

Bidon bosses


Cable Stops


Cable Routing at Drop Out


Cable Routing at Wishbone


Now I just need to have Brian from Kelson Bikes TIG the connector tube on and then glue the seat stay in and it’s off to the powder coater.

BAM!!!

Posted: December 9, 2011 in Uncategorized

The Ritchey Carbon Pro cyclocross fork just showed up.  I need it to set up the rear triangle of the bike and get my BB drop and all those kind of measurements right and I didn’t think it was going to get here in time to work on the bike this weekend but it just showed up so it’s on!

On the Way

Posted: November 16, 2011 in Uncategorized

So I just bought $500 dollars worth of tubes. lugs, and what-not from Nova Cycle Supply out of California.  The reason that the total was so high is that I bought an extra set of generic lugs and an extra tube so I can do a little actual lug brazing practice.  I also went with a Taylor Carbon Wishbone Seatstay kit.  I was told that I might be biting off more than I can chew going with the carbon stay but this is how I figure it:

Going with the carbon stay entails welding/brazing a connector tube to the seat tube and then bonding the wishbone to it and then bolting the other end of the stays to the drop-outs that are designed for such.

Going with the steel seat stays entails additional brazing – at the drop-outs, the seat lug, a stiffening bridge, and the cantilever mounts.  All areas that a noob such as myself may mis-align.

I think that the carbon stay option is going to be easier and look totally pimp too.  The one issue that arises in going this route is that the joint at the connector tube/seat tube won’t be strong enough if I do a fillet braze with silver solder but Brian up at Kelson Bikes in Ashton, ID said he would TIG the connector tube on for me and I’m hoping that since he incorporates carbon in some of his bikes he will help me out with bonding the stay to the connector tube.  I think I might probably smooth out his TIG bead with a little silver solder after the fact to keep the lugged “beadless” aesthetic going.

Hopefully I’ll have the tubes and stuff by this weekend.

Just sayin’…

Posted: November 15, 2011 in Uncategorized

I believe the two greatest inventions in the history of the world are STI shifters and the iPod Touch.

My First Brazing Attempt

Posted: November 13, 2011 in Uncategorized

So here are the results of my first brazing attempt – but before you see it I want to give you some background.  I’ve never brazed before in my life.  I took a TIG welding course at the local technical college about ten years ago but have never TIG’d since then.  I did work at a trailer manufacturer for a few weeks MIG welding right after I had finished the TIG course but my back couldn’t take moving the trailer parts around all day so that was short lived.  Armed with merely the knowledge gleaned from the frame building book and some internet instruction I turned to.

Quite a learning experience.  First off I couldn’t find any thin walled tubing locally so I ended up getting some 1″ OD mild steel that was almost 3mm thick – over twice as thick as the tubing I would eventually be using but I had to start somewhere.  After mitering and cleaning the tubing I fluxed everything up with Radnor Stay-Silv (white) erring on the side of too much.  Then getting the stupid little MAPP torch lit became an exercise in frustration but I finally figured it out.  I followed the instructions that came with the torch as to how to adjust the flame and what it should look like for what I wanted to do and I was sure the flame was too low but I proceeded.  Since I was doing a fillet braze instead of lugs I used the Safety-Silv 45 brazing rod instead of the S-S 56.  I had the mitered tube in the vice so that the other tube could balance on top of the miter.  After doing a little “tack” braze I switched the tubing around so that the non-mitered tube was in the vice and the mitered one was facing up.

The first thing that caused concern was that the flux immediately got covered in black soot when I applied the flame but I proceeded undaunted.  The flux was interesting in that I had invisioned it melting and getting really runny but with hindsight it’s pretty amazing stuff.  It never got runnier than honey and after having the heat on it long enough it starting acting as the book described – it got clear and then slightly greenish yellow.  At first I was a little apprehensive about having the torch so close but knowing that the tubing needed to start glowing (and that it was twice as thick as it should be) and that the flux started acting as described I pressed on – I was even able to move the flux around with the brazing rod just as the book described.  The rod finally started melting and at first it was clinging to only one of the tubes but by applying heat to the other tube I got it to flow over to it.  I’m not sure if this is the correct proceedure but I basically put the torch where I wanted the silver to flow to.   Since the set up was in a vice and I wasn’t sure how fast the tubing gets out of the proper heat range I decided not to use the pliers to turn the tube around so I could get at the other side of  the joint.  It was a little awkward but I was able to lean over and get the back side. 

When I was satisfied that I had a decent fittet all the way around the tubing I turned off the torch and went to Mc Donald’s to grab a burger while eveything cooled off.  Then I cleaned everything off and dressed the fillet up a little.  See the results below:

This slideshow requires JavaScript.

…Anitidote or Sodium – I’m leaning toward Antidote Bikes.

A Bike is a Bike…

Posted: November 9, 2011 in Uncategorized

So if this thing takes off what am I going to call my bike (company)?  I’m considering “Habit”.

I’ve always wanted to get into building frames – I took a job with a small manufacturer in Northern Idaho to that end but it ended up being a shady deal so that was a dead end.  Then I took a TIG welding class at the local technical college but I haven’t had any opportunity to exploit that talent (or lack thereof) either.  But I now have a little expendable cash and a wife that understands my passion for bikes and the need to take dominion in that regards so I purchased Chimonas’ Lugged Bicycle Frame Construction, A Manual for the First Time Builder…  I picked up a MAPP gas torch at the Home Despot and some flux and silver solder at Air Gas and I’m heading out to the steel place Saturday to pick up some mild steel tubing to practice brazing with and then I’ll order my tubes and lugs and what not and see if I can avoid burning anything down.